

Gift Wrap Mugs to Match Fandom Gifts in Under Five Minutes
For speed, use the tissue-and-cellophane gather method. For a fully wrapped, boxed look, use the cylinder roll-and-pleat method. For zero fuss, drop the mug in a small box with padding and call it done. Whichever you pick, pad the mug with tissue or bubble wrap first, and always carry it from the base, not the rim.
TL;DR:
- Using the cylinder roll-and-pleat method creates a polished, fully enclosed mug that stands upright and shows a neat, seamless finish.
- The tissue and cellophane wrapping method offers the fastest option, taking under five minutes, especially effective for themed sets or minimalist presentation.
- For shipping, wrap each mug in bubble wrap and reinforce the box with cushioning and “fragile” labels to prevent damage during transit.
- The boxed method is the simplest for bulk or casual gifting, especially when combining mugs with themed sets like coffee, movie, or spa kits.
- Matching the internal filler and exterior wrap to the mug’s theme enhances the gift’s impact, such as pairing horror mugs with spooky snacks or movie night sets.
Table of Contents
- What Do You Need to Gift Wrap Mugs Properly?
- How Do You Wrap a Mug Using the Cylinder Roll Method?
- Is the Tissue and Cellophane Method Faster Than Wrapping Paper?
- How Do You Make a Gift Bag Out of Wrapping Paper for a Mug?
- Should You Just Put the Mug in a Box Instead?
- How Do You Pack a Mug Safely for Shipping or Travel?
- What Are Some Creative Ways to Decorate a Wrapped Mug?
- What Do Pop-Culture Mug Fans Actually Want Inside the Wrap?
- Which Mug Wrapping Method Should You Actually Use?
- Find a Mug That’s Already Gift Ready
- Sources
What Do You Need to Gift Wrap Mugs Properly?
Before you touch a roll of paper, get everything laid out. Fumbling for scissors mid-fold is how seams end up crooked.
Here’s the full list:
- Wrapping paper (medium weight, not the flimsy dollar-store kind)
- Tissue paper, 2 to 3 sheets in coordinating colors
- Cellophane or clear gift wrap
- Double-sided tape
- Scissors and a ruler or measuring tape
- Ribbon or twine
- A rubber band (for securing gathers before the ribbon goes on)
- A small box (optional, for the boxed method)
- Bubble wrap (for padding and shipping)
- Packing tape (for shipping or transport boxes)
Sizing this to your mug matters more than most people think. A standard 11 oz mug is typically considered to be a medium-sized mug with average dimensions appropriate for most wrapping techniques. For the cylinder method, cut your paper width to roughly the mug’s circumference plus a bit for the seam overlap, and cut the height to about twice the mug’s height plus its diameter, providing enough excess to pleat the base and gather the top. If you’re wrapping a different mug, measure the circumference with a soft tape measure or a strip of paper wrapped around the widest point, then apply the same math.
On tape choice: double-sided tape gives a cleaner seam than standard tape because it disappears inside the fold instead of showing on the surface, which matters most on curved surfaces where a visible strip catches the eye immediately.
Pro Tip: A medium-weight paper is the sweet spot. Anything too thin tears when you pleat the base; anything too stiff refuses to crease and springs back open.
One more thing worth flagging before you start folding: mugs are bottom-heavy once they’re filled with anything, so keep that in mind as you plan your seams and tape placement.
How Do You Wrap a Mug Using the Cylinder Roll Method?
This is the technique that gets you a fully enclosed mug with no visible bottom, standing upright like it came from a store. It takes a few extra minutes over the tissue method, but the finish is worth it for a gift that needs to look considered.
- Lay your wrapping paper landscape side up on a flat surface, patterned side down.
- Place the mug on its side at one edge of the paper, and roll it once to check that the paper wraps fully around with 1 to 2 inches of overlap. Adjust before you commit to a cut.
- Roll the mug completely, overlapping the edge and sealing the seam with double-sided tape along its full length.
- With the mug still lying on its side, push the excess paper at one end down flat against the surface. You’ll see it naturally form two triangular “wings” on either side of the mug’s base.
- Fold those wings in toward the center, then fold the remaining flap up and over to close the base like you’re wrapping a box end. This pleated base is what lets the wrapped mug stand on its own once you flip it upright.
- Secure the folded base with a small piece of tape at the center point.
- Stand the mug upright. Tuck a small piece of tissue paper inside the open rim to protect it and hide the interior.
- Gather the excess paper at the top, cinch it with a rubber band if needed, then tie ribbon over the gather and trim any uneven edges.
The handle is usually the first thing to cause trouble. If you feel a bulge where the handle sits, don’t fight it. Roll the paper slightly looser on that side before sealing the seam, and the extra slack will absorb the shape without a visible lump. If your seam looks messy, run your finger along the tape line to flatten it. Rotate the finished seam to the back before you set the mug down.
Is the Tissue and Cellophane Method Faster Than Wrapping Paper?
Yes, noticeably. This is the go-to when you need something done in under five minutes and it still looks intentional. It’s also the better choice if the mug is part of a themed set, since the sheer cellophane lets a peek of what’s inside show through.
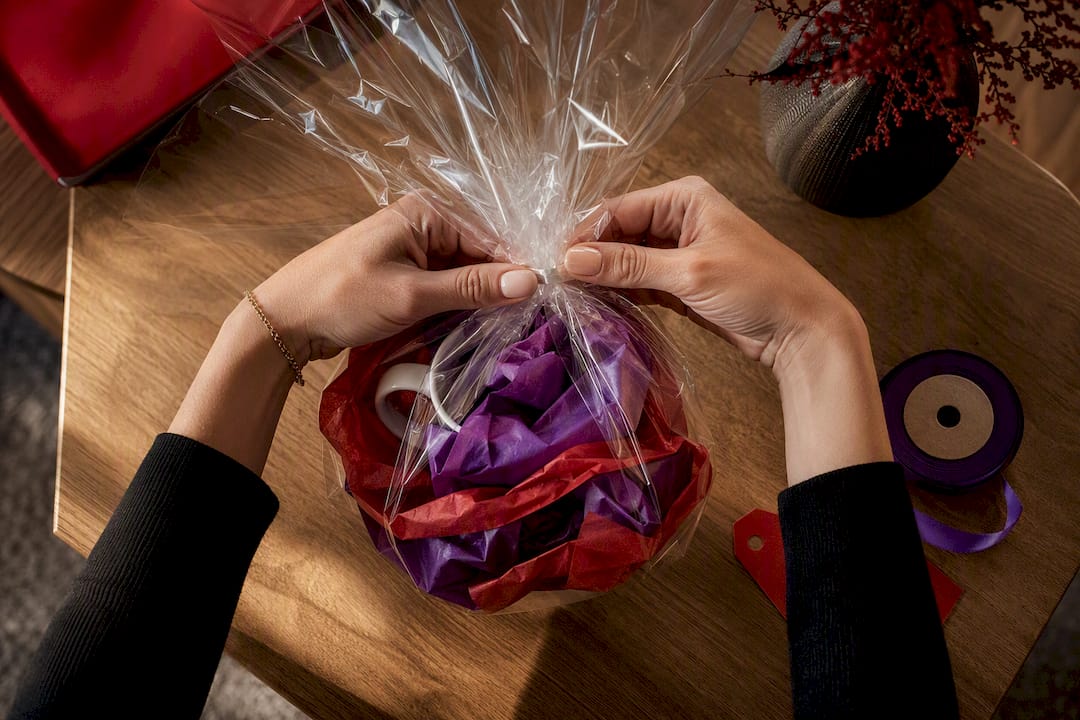
The order matters here. Layer tissue paper first, directly against the mug, then wrap cellophane around the outside as the final layer. Two or three sheets of tissue in contrasting colors create depth that a single flat color can’t match, and the layering adds a bit of cushioning too.
To assemble:
- Stand two or three tissue sheets up, fanned slightly, and set the mug upright in the center.
- Bring the tissue corners up around the mug and bunch them loosely at the top rather than pulling tight, which is what causes tearing.
- Wrap a sheet of cellophane around the whole bundle and gather it at the same point.
- Secure with a rubber band first for grip, then hide the band under a ribbon tied in a bow.
For the top finish, you have options. Fluff the tissue outward for a puffed, generous look, or trim it back with scissors for a tighter, more minimal silhouette. A small ornament, charm, or tag tucked into the gathered top adds a finishing detail that makes the whole thing look styled rather than rushed.
How Do You Make a Gift Bag Out of Wrapping Paper for a Mug?
If you like the structure of a gift bag but don’t have one on hand, you can build one from a flat sheet of wrapping paper in about the same time it takes to find a bag in a drawer.
Start with the math. For a typical medium-sized mug, cut your paper width to about four times the mug’s diameter plus a bit extra for the side seam, and the height to roughly twice the mug’s height plus its diameter to account for the base and a foldable top. That gives you enough paper to fold into a standing base rather than a flat tube.
- Fold the paper into a rectangular tube and tape the long side seam closed.
- At one open end, fold in the sides to create flaps, then fold the bottom flap up to form a flat base, similar to closing a paper lunch bag.
- Tape the base flaps securely, then press a piece of tape or cardstock inside the base for reinforcement.
- Slide the mug in, cushioning the sides with a bit of tissue if there’s extra room.
- Fold the top edge down once or twice for a finished lip, punch a hole through both layers, and thread ribbon through to cinch it closed.
If the mug is filled with anything heavy, like a coffee sampler or a set of small gifts, reinforce the base with a second layer of tape or a small cardboard square before you insert the mug. A standing bag holds up better under weight than a loose paper tube, especially once ribbon is cinched at the top and the whole thing gets carried by that handle.
Should You Just Put the Mug in a Box Instead?
Honestly, sometimes yes. The boxed method is the least fussy option and the most forgiving if your folding skills are rusty. Pick a box just a couple inches larger than the mug on each side, line the bottom with crumpled paper or bubble wrap, and pack the sides tight enough that the mug can’t slide when you shake the box gently.
Where the boxed method really earns its keep is filling. An empty mug is a fine gift; a themed mug is a memorable one.
- Coffee or tea sampler: pair the mug with a few single-origin packets or a premium coffee gift set for a coworker or coffee obsessive.
- Movie-night kit: mug, a bag of microwave popcorn, and a candy box, wrapped around a movie-quote mug for the film fan on your list.
- Spa kit: mug filled with tea bags, a bath bomb, and a small candle.
- Coworker-safe humor set: a funny office mug paired with a snack bar or two, nothing that reads as too personal.
- Snack bundle: mug stuffed with individually wrapped candies or cookies, cushioned so nothing crushes.
You can also skip wrapping the mug entirely and use the mug itself as the wrapping, stuffing it with a gift card, cookies, or wrapped candies and covering the opening with a coffee filter tied down with twine. Once your box is packed, place the ribbon bow off-center rather than dead-center for a slightly more polished look, and tuck the gift tag under the ribbon knot rather than taping it loose to the lid.
How Do You Pack a Mug Safely for Shipping or Travel?
A mug that survives a five-minute car ride can still break in a shipping box tossed around a delivery truck. Treat shipping and hand-carrying differently.
For shipping or longer transport:
- Wrap each mug individually in bubble wrap, taping the seam so it doesn’t unravel in transit.
- Add cushioning to the bottom and sides of the shipping box before placing the mug, and pad the top as well once it’s in.
- For multiple mugs, use cardboard dividers or stack crumpled paper between each one so they never touch directly.
- Tape the box shut with several strips along every seam, and mark it “fragile” clearly on at least two sides.
For handheld transport, the biggest risk is the handle. Wrap the handle area with a bit of extra bubble wrap if the mug will be jostled in a bag, and always lift and carry from the base rather than the handle. A filled mug is bottom-heavy, and lifting by the handle alone puts strain exactly where a mug is most likely to crack.
If you’re shipping something with real sentimental or monetary value, it’s worth asking your carrier about insurance coverage before you drop it off. That’s a call to make with the shipping service directly, not something a wrapping guide can settle for you.
What Are Some Creative Ways to Decorate a Wrapped Mug?
Small details separate a gift that looks thrown-together from one that looks planned. None of these take more than a couple of minutes.
- Tie a double-loop bow instead of a single loop, and curl the ribbon ends with scissors for extra texture.
- Add a strip of washi tape along the seam of the cylinder method to hide an imperfect edge and add color at the same time.
- Tuck a tiny ornament, charm, or dried flower into the top gather for a detail that catches the eye first.
- Skip paper entirely and wrap in fabric using a furoshiki-style knot, which is reusable and looks intentional rather than like an eco shortcut.
- Use kraft paper and twine for a rustic, low-cost alternative when you’re out of wrapping paper or want a more natural look.
- A small drawstring cloth pouch works for the mug plus a few extras, and it’s reusable packaging the recipient can keep.
Pro Tip: Match your ribbon and tissue colors to the mug’s actual design, not just the season. A pop-culture mug with a bold color palette looks better wrapped in a matching accent than in generic holiday red and green.
What Do Pop-Culture Mug Fans Actually Want Inside the Wrap?
Pairing the wrap to the mug matters more than people expect. A horror-themed mug filled with generic candy canes feels like a mismatch. The same mug paired with a small horror-movie marathon list and a bag of themed snacks feels like someone paid attention.
The pairing logic is simple once you see it: a movie-quote mug goes with a film-night sampler, a desk-friendly novelty mug goes with a coffee or tea set for the home office crowd, and a fandom mug goes with a small collectible or sticker sheet tied into the same franchise.
Fan-inspired merchandise works best as a gift when the wrapping and filler carry the same theme through to the end, not just the mug itself.
McLaren Tee Hub’s catalog runs across movies, anime, sci-fi, and horror, which gives a lot of room to match a mug’s specific joke or reference to a filler that actually lands with the person receiving it, rather than a generic add-on.
Which Mug Wrapping Method Should You Actually Use?
If you’re wrapping something tonight for tomorrow morning, go with tissue and cellophane. It takes minutes, looks intentional, and hides minor imperfections in a way a tight paper seam won’t.
For a batch of mugs, say for a whole team or a family gift exchange, the boxed method wins on consistency. You can pack ten mugs the same way in the time it takes to hand-roll two cylinders.
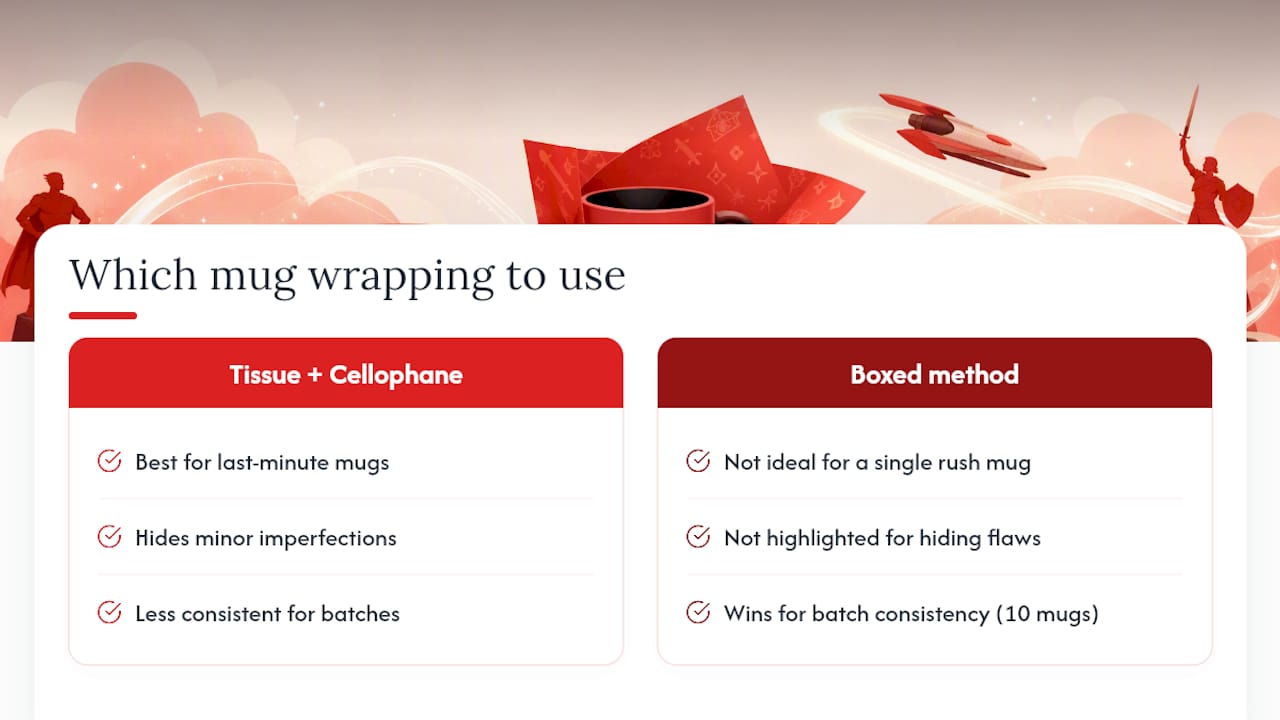
Save the cylinder roll for the one gift you want to look genuinely polished, a mug for someone whose gift always gets unwrapped first at the table. It takes longer, but the seamless, standing result is worth the extra ten minutes.
Whatever you choose, don’t skip the base support. A filled mug wrapped without a firm bottom is the single most common way these gifts get damaged before they’re even opened. If you want more mug pairing ideas before you start wrapping, McLaren Tee Hub’s style guides for fun mugs are worth a look.
— Nicholas
Find a Mug That’s Already Gift Ready
Skip the search for the “right” mug entirely. McLaren Tee Hub carries pop-culture mugs across horror, sci-fi, anime, and movie fandoms, already sized to standard 11 oz proportions so every wrapping method in this guide works without adjustment.

A design like the Facehugger glossy mug pairs naturally with a horror movie-night filler and the cylinder roll method for a gift that looks planned, not grabbed at the last minute. Prefer something a little more understated for a coworker exchange? Browse the catalog, pick a mug that fits the person, and pair it with any of the wrap styles above. Shop the mug collection now and have your gift wrapped and ready before the holiday rush hits.
Sources
- Make Your Own Gift Bag Out of Wrapping Paper: Step-by-Step Guide
- How to Wrap Mugs: 9 Steps (with Pictures)
- How to Gift Wrap a Mug | 8 Easy Steps (2026)